Fabric Cutting
Mark and cut the fabric correctly before installation
A bit of technique on fabric before cutting it
Before cutting the covering fabric and avoiding mistakes, it is good to assimilate technical elements to understand the vocabulary used by professionals.
Warp, weft, grain, cross-grain, and bias.
Fabric is actually a crossing of perpendicular threads.
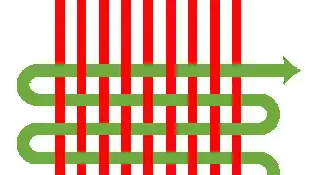
The weaving process consists of stretching rows of threads (here vertical and red) firmly on a frame. These are called warp threads, in the direction of the length of the woven band. This is named the grain of the fabric.
Then, threads are crossed perpendicularly (here horizontal and green). These are called weft threads, in the direction of the width of the woven band. This is named the cross-grain of the fabric.
The diagonals of these perpendicular directions are named the bias of the fabric.
This weaving process explains why warp threads are tighter than weft threads and therefore why the fabric shows a difference in elasticity between its width and length.
The grain can stretch less than the cross-grain.
This must be taken into account so that the different pieces of fabric are assembled coherently on the armchair and the "cover" is plumb: the grain along the vertical of the seat.
This arrangement also explains that the elasticity of the fabric is maximal in the direction of the bias.
It is possible to cut a bias ribbon on the diagonal. This ribbon can then follow straight lines and perfectly fit curved lines during the finishing operation.
Tip: if you "snap" the fabric by pulling it violently, a more "clear" sound is obtained along the grain; a more "dull" sound along the cross-grain.
The selvedge (the edge) is the width of a bolt or roll of fabric, generally expressed in cm.
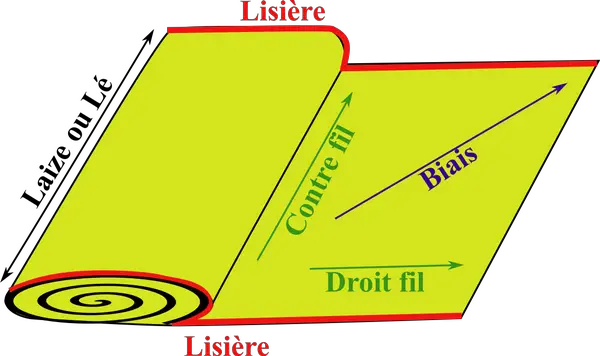
The selvedges, the lateral edges of the fabric, are often woven tighter than the rest of the fabric. Manufacturers inscribe their name and logo with the colors used and sometimes codes for wear resistance.
Top and bottom, wrong side and right side of the fabric
In some cases, there is a top and a bottom of the fabric to determine. This is the case, for example, with pile fabrics, where you need to follow the direction of the pile, or with patterned fabrics. You need to make sure to place the top of the pattern at the top.
If on some fabrics the right side and wrong side are easily distinguished, for others, you need to double your vigilance. Generally, one side is slightly shinier than the other.
Tip: on the selvedges, you notice holes formed by the pins used to secure the fabric during its treatment process. The pins enter on the wrong side of the fabric and come out on the right side; the side where the holes are rougher is therefore the right side.
What is important is to choose the side you like best and which will be your right side.
Cutting Pattern
You now have the necessary knowledge to trace your pattern to optimize the cutting of your fabric. Below is an example of a pattern for a seat of common dimensions, featuring flanks.
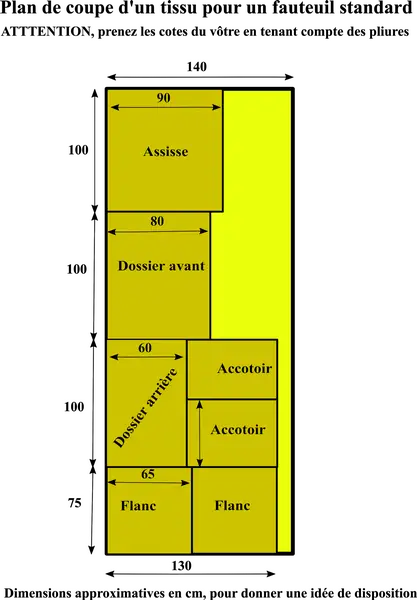

Once the tracing is finished, the cutting is done with large tailor's shears with thick blades, reserved for fabric, which cleanly cut multiple layers.

Wiss W22W shears for upholstery fabric
- Length of 318 mm
- Forged thick blades, suitable for upholstery fabric, carpets, and curtains
- Cutting multiple layers