Reupholstering an armchair traditionally
Tutorial: steps 11 to 15
The 15 steps of reupholstering an armchair
11. Laying animal hair
A nice little step, with no particular difficulty.
The purpose of this step is to smooth out the irregularities in the padding caused by tacking points and hard spots in some vegetable hair strands.
The laces holding the animal hair are laid transversely, flush with the padding.
Note: For a backrest, the laces are vertical.
The layer of animal hair is about 1 to 2 cm thick and does not overhang the rolls. If necessary, it can also be arranged "in whiskers" on the edges where there is a lack of padding.

Laying Animal Hair #1
The laces are always transverse, spaced about ten cm apart.
Consumable:- Tacking string

Laying Animal Hair #2
Same as vegetable hair

Laying Animal Hair #3
Same as vegetable hair
12. Laying the white cloth
Attention... This is the dress rehearsal before laying the fabric.
The white cloth is torn along the grain, leaving a margin of 5 cm from the largest dimensions, measured up to the seat belt.
As with other cloths, the axes of symmetry of the piece of cloth are drawn to align them with those of the armchair.
The cloth must be well stretched and smooth when it is fixed with temporary upholstery tacks and notched straight or in a Y shape depending on the uprights.
The cloth is tacked starting from the middle of the sides, taking care to alternate the facing tacks.
To avoid overlapping the excess thickness, the folds in the corners are made in the opposite direction to that desired for the final fabric.
In the same spirit, the excess fabric is cut inside the fold, at 2 cm from the edges.
Be careful not to let the threads of the cloth stick out, so that they are not visible when the fabric is laid.

Laying White Cloth #1
Fix the white cloth with temporary upholstery tacks.
Remember to draw the axis of symmetry to place the cloth correctly on the armchair
- White Cloth
- Temporary upholstery tacks

Upholstery tacks
Tacks 50 mm
Round plastic head
For fixing on cloth and fabrics or for marking during upholstery work

Laying White Cloth #2
Cut the cloth along the diagonal axis of the upright up to the edge.

Laying White Cloth #3
Then cut to a point on the right edge of the upright

Laying White Cloth #4
Remember to notch in the rounded areas.

Laying White Cloth #5
Fix the cloth with upholstery tacks.
Remember to use a nail punch in hard-to-reach places.
- Medium upholstery tacks

Blued steel upholstery tacks
Ø 14 mm - 60 g
For laying cloths, webbing, spring lashing and filling

Laying White Cloth #6
Remember to leave room for the fabric that will cover it.
13. Laying the wadding
A little cloudy moment...
This is an additional layer of cotton batting or synthetic fibers (about 200g/m2), placed on the white cloth to prevent the hairs from poking through. It is also a protection against wear of the fabric on the padding, while providing extra comfort.
In one direction, the wadding simply tears by hand; in the other direction, you may need scissors... Beware, wadding has a strong blunting effect!
The wadding is placed on the white cloth, with the softest side in contact with the covering fabric. The edges of the wadding can go flush with the tacks, but must not protrude under the fabric.
Care must be taken not to create an unsightly staircase with a square-cut edge.
Note: For backrests, a half-thickness may suffice... But the splitting operation requires much attention to achieve a uniform thickness.

Padding installation #1
In one direction it is easy to cut by hand…
Caution: padding is the death of scissors!
- Temporary upholstery tacks
- Cotton wadding

Padding sold by the meter 100 % polyester
200 g/m², 160 cm wide, sold by the meter
Recycled fibers, thermally bonded, Oeko-Tex certified
Washable at 40 °C

Padding installation #2
The upholstery hammer helps size the padding while avoiding a cut that is too straight and abrupt.
Tool:ScissorsUpholstery hammer for trimming
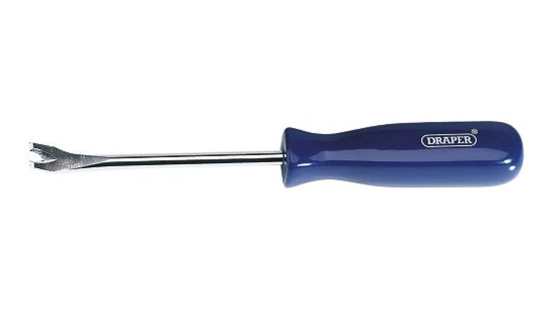
Draper 64804
195mm Tack Lifter

Padding installation #3
End of padding installation on the armchair
14. Covering fabric installation and tacking
A major moment of danger… "measure twice cute once!".
How to choose your upholstery fabric?
The selvage is the edge of the fabric from which no thread emerges, where the color differs and where there is sometimes writing.
The grain is always parallel to the selvage; it corresponds to the warp thread; the fabric is not elastic at all in this direction.
In upholstery, you must lay the grain of the fabric along the depth of the seat and the height of the backrest.
When running the flat of your hand over fabrics like velvet, they become rough and raise their pile in one direction; in the other direction, they soften as the pile lies down. In the latter case, the pile should lie toward the front of the seat and toward the bottom of the backrest.
Before cutting the various pieces of upholstery fabric, it is good to make a pattern to optimize fabric usage while respecting the recommended orientations.
The experience gained from installing the white canvas serves to make a flawless cut… Indeed, there will be no other layer left to mask them!
It is sometimes more practical to use large upholstery tacks to pre-position the fabric than to plant temporary upholstery tacks. This makes it easier to mask the holes during the piped or tacked finish.
Perform the necessary crantings one after the other, taking care to finalize the previous one before starting the next.
You must also take your time to evenly distribute the folds of the fabric along the belt… As long as the result is not satisfactory, it is better to dismantle the entire pre-positioning of the fabric rather than fiddle with it.
For a tacked finish, fold back about 1 cm of fabric flush with the rebate. If you want to space out the tacks, you need (or can improvise) a spacer (or guide).
It is best to start tacking the corners of the seat to ensure the fabric is plumb.
The heads of decorative tacks are relatively mobile after tacking, which allows adjusting their final positions using a tack puller.

Fabric installation #1
Beware of haste: you may tend to cut too short.
Pre-position the fabric with temporary upholstery tacks or large upholstery tacks.
- Scissors
- Fabric
- Upholstery tacks

Fabric installation #2
Here it is a tack puller adapted to the domed profile of the tack.
Remember to mark the spacing of the tacks in case of discontinuous tacking.
- "Special" tack puller.

Draper
Magnetic upholstery hammer
Hickory handle, 190 g

Fabric installation #3
This type of upholstery hammer prevents "marking" the tacks.
A plastic card protects the wood of the armchair
- Upholstery hammer with plastic tip

Osborne 36
Bronze nylon tip
Magnetic tip 7 mm, plastic tip 12 mm

Fabric installation #4
You can also use an anglaisage cardboard to avoid a row of tacks

Fabric installation #5
THE LAST TACK!
15. Laying the calico.
Careful... you might forget it!
It is a fabric woven very tightly to hold horsehair dust and prevent webbing from fraying.
It is placed under the webbing after turning the armchair over. Small upholstery tacks are used.
The grain runs along the depth. Straight or Y-shaped notches are cut around the legs.
The calico must hide the webbing while remaining as inconspicuous as possible.

Laying the calico
This is a step that is easy to forget!
Consumables:- Calico fabric
- Small upholstery tacks

Grey calico fabric
100 % cotton, 150 cm wide
Sold by the meter, delivered in a single piece
Holds horsehair dust